Wednesday, December 15, 2010

Chocolate marshmallow cookies


I went to a cookie party last night and made these yummy concoctions. They are sooo moist, gooey and chocolatlie, you can’t go wrong! I wish I would have thought to sprinkle crushed candy cane on top to make them festive!

1/2 cup butter
1 cup sugar
1 egg
1 teaspoon vanilla
1/4 cup milk
1 3/4 cup flour
1/2 teaspoon salt
1/2 teaspoon baking soda
1/2 cup cocoa
1 package large marshmallows

Blend butter and sugar. Add egg, vanilla, milk and remaining ingredients, leaving out marshmallows. Scoop out cookies with mini ice cream scoop. Bake at 350 degrees for 5-7 minutes. Remove from oven.

Cut marshmallows into thirds. Push a third of a marshmallow into the center of each cookie. Bake for 2 more minutes. Let cool and frost. Makes just shy of 2 dozen with a pampered chef med. Scoop!
*frosting*
2 cups powdered sugar

1/2 teaspoon salt

5 tablespoons milk

3 tablespoons cocoa

3 tablespoons melted butter

Whisk all ingredients together until smooth.

Tuesday, December 14, 2010

IHOP French Toast and Coconut Syrup

I found this gem on the Sisters Cafe site and had to try it. I bought a loaf of French bread at the store and happened to have everything else on hand. It was super yummy! My family ate it up and the syrup is oddly addicting and seriously delicious. It's a really light coconut flavor too. The website mentioned that if you don't like coconut, you can substitute vanilla extract instead. Oh, and I doubled the recipe and it was a perfect amount for a whole French bread loaf, cut thick (about 1/2 inch to 3/4 inch is what I did).

(Photo courtesy The Sisters Cafe)

IHOP French Toast

2 eggs

½ c. milk
1/8 tsp salt
1 tsp vanilla
3 Tbsp. flour
6 slices of thick sliced French bread

First beat eggs, then add remaining ingredients with electric mixer. Dip both sides of bread and place in hot buttered pan. Flip over when browned. Serve with Coconut Syrup.

Coconut Syrup

7-8 T. butter
¾ c. buttermilk
1 c. sugar
½ tsp baking soda
1 tsp coconut extract (or you can substitute vanilla, but I love the coconut!)

Place butter, buttermilk and sugar in a pot. Then turn stove on medium and stir until butter melts and sugar dissolves. Bring to a boil and boil one minute. Remove from heat and add soda and flavoring. It will bubble up; just continue to stir and give it a few minutes for the 'fizz' to reduce before serving.

Monday, December 6, 2010

Tomato Basil Parmesan Soup

What? We have a recipe blog??


Silly me, I almost forgot! It's been that long!


However, I made this soup, which I got from the Sister's Cafe website, and after tasting just one tiny little bite, I knew I'd be posting this. It's just that good. And easy. And good.


Tomato, Basil, and Parmesan Soup

2 (14oz) cans diced tomatoes, with juice

1 cup finely diced celery

1 cup finely diced carrots

4 cups chicken broth

1 cup finely diced onions

1 bay leaf

1 tsp dried or 1 Tbsp fresh oregano

1 Tbsp dried or 1/4 cup fresh basil

1/2 cup butter

1/2 cup flour

1 cup Parmesan cheese (like the Kraft stuff)

2 cups half and half, warmed

1 tsp salt

1/2 tsp black pepper

In a large slow cooker, combine tomatoes, celery, carrots, chicken broth, onions, bay leaf, oregano, and basil (if using fresh oregano and basil; if using dried oregano and basil, add those two ingredients in the last hour of cooking - I used fresh basil and dried oregano). Cover and cook on low for 5 to 7 hours, until the flavors are blended and vegetables are soft.

**Sister's Cafe website suggests using a food processor to finely dice all the vegetables. After dicing them by hand, I'd have to suggest the food processor too. Mine just weren't small enough!

About an hour before serving prepare a roux: Melt butter over low heat in a skillet and add flour; stir constantly with a whisk for 5 to 7 minutes. Slowly stir in one cup hot soup from the slow cooker. Add another 3 cups of soup and stir until smooth.

Add all back into the slow cooker. Stir and add the Parmesan cheese, warmed half and half, salt, and pepper (and dried basil and/or oregano, if not using fresh). Cover and cook on low for another hour until ready to serve. Garnish with Parmesan cheese and freshly ground black pepper to taste.

Sunday, November 7, 2010

Rosemary Potatoes


These potatoes are a perfect side to just about any dish and look fantastic. Okay, they taste great as well. My favorite thing about these potatoes though, is that they are sooooo easy and yet everyone thinks you were cooking all day! I decided to cook these with 20 minutes until dinner was served and had plenty of time! I love the microwave method and have switched up the spices many times...so good and so easy it is a new favorite. Hope you cook it up and fool your hubbies soon :)
Rosemary Potatoes

6 small red skinned potatoes, cleaned but not peeled
2T. extra virgin olive oil
1 t. chopped fresh rosemary (1/2 t. if using dried rosemary)
1/4 t. salt
1/8 t. black pepper

Pierce each potatoes a few times with a fork. Place the potatoes, in a single layer, in a microwave safe baking dish and cover with plastic wrap. Microwave on high until the potatoes are about half tender, about 5 minutes. Carefully remove the plastic wrap, it releases all the steam! Let the potatoes cool and cut them lengthwise into quarters.

Heat the oil and rosemary in a large skillet over med-high heat until the oil is hot. Add the potatoes. Cook, stirring occasionally, until crispy and golden brown, about 8 minutes. Season with salt and pepper and serve hot!

Saturday, October 16, 2010

Homemade Rolls

I can't take credit for this recipe. I actually can't take credit for any of my recipes. This recipe comes from my good friend Rachel. When we lived in Cleveland, Rachel taught me a little about bread making and I've been making these rolls (and her cinnamon rolls!) ever since. If you want to make wheat rolls, use half whole wheat flour in place of the white flour. I've never done that, but either way they are delicious.


NOTE: Use the timer because this has to be exact.

4 cups whole milk warmed in microwave on high for 3 minutes. Should be luke warm to touch. (Mine is usually luke warm after 2 minutes so just warm it until the milk is luke warm)

1/4 cup yeast

1 cup sugar

**Sprinkle the yeast over the milk and the sugar over the yeast. Let sit for exactly ten minutes.

Then add 4 eggs and 5 cups flour, Beat for five minutes. Let stand for 20 minutes (covered)

Then add 1 cup vegetable or canola oil, 1 Tbsp salt, and 7 cups flour ( I would add 6 1/2 the first time you make them because you will probably use a lot of flour to roll them out and also you will most likely handle the dough more than you will when you are used to the recipe). Mix until well blended. Add 1 stick of butter (room temp). Beat for five minutes. Let rise for 30 minutes (covered). Dough will rise above bowl so keep wax paper or another non-stick cover loosely on bowl. Dump out dough on well floured large surface. Separate into three lumps. Roll each lump into pizza rounds. Then use a pizza cutter and cut as you would a pizza. Then start on the outside edge and roll in towards the middle making crescent shaped rolls. Place on a greased cookie sheet. Cover very loosely (I cover mine with saran wrap sprayed with PAM and just lookely place it on top of the rolls) and let rise until double again (about 1 hour). Cook at 350 for 15 minutes or until golden brown.

You can brush them with butter while they are still hot to make them really moist. I always do this and use salted butter since it gives them more flavor.

Plan about 3-4 hours total time for these to be done. This recipe makes tons of rolls so after you bake them, let them cool completely and then stick as many as you can (still stuck together. if they are stuck together from baking) in a large ziplock bag and freeze in the freezer. To defrost bags, just place on your counter in the morning, they should be defrosted in 1-2 hours. Or you can microwave for 15 seconds.
This is what it looked like after it has been rising for almost an hour. It actually got even bigger and started to spill over the side.
The three rounds you make after the dough has risen for an hour.

Roll each ball into a circle, not paper thin but not too thick.

Cut each with a pizza cutter. I usually cut into eighths, and then cut each of those "slices" into three triangles, so each round will make about 24 rolls (about 70-75 each batch). Some of yours will be smaller and some bigger, it doesn't matter if they are the same size.

Roll them up and place them on a sprayed cookie sheet. I counted how many cookie sheets I own. Eleven. You can also place yours closer together so they "stick" together once they double and are baked. I think it makes them not as dry if you let them stick together, I just don't usually think about it when I'm making them.

Yummy. My kids could eat these unbaked. Don't worry though, we definitely make them wait. They just end up eating three each straight out of the oven!

After they've doubled in size. My kids "helped" me roll them up so some are a little funktified, but they all turn out in the end.
Fresh out of the oven. Mine don't stick together like Rachel's do. If I put in one more row of rolls they would, but I think no matter what these are yummy!

Out of the oven and being smothered with love... I mean, butter. Same thing.

Tuesday, August 17, 2010

Cream Puff Cake


This recipe is from my Taste of Home magazine and I made it for my grandparents when they came for dinner on Sunday. It was delicious! My neighbor actually brought me cream puffs the same day and, I think, this was much better. Plus, you don't have to fill individual cream puffs!

Ingredients

* 1 cup water
* 1/2 cup butter, cubed
* 1 cup all-purpose flour
* 4 eggs
*

FILLING:
* 1 package (8 ounces) cream cheese, softened
* 2-1/2 cups 2% milk
* 3 packages (3.3 ounces each) instant white chocolate or vanilla pudding mix
* 1 carton (8 ounces) frozen whipped topping, thawed (I used a 1/2 pint of real whipping cream and beat it with a little sugar, vanilla, and almond flavoring..I HIGHLY recommend it!!)

Directions

* In a large saucepan, bring water and butter to a boil. Add flour all at once and stir until a smooth ball forms. Remove from the heat; let stand for 5 minutes. Add the eggs, one at a time, beating well after each addition. Continue beating until smooth and shiny(I used a hand mixer and it worked fine).
* Transfer to a greased 13-in. x 9-in. baking dish. Bake at 400° for 22-26 minutes or until puffed and golden brown. Cool completely on a wire rack.
* For filling, in a large bowl, beat the cream cheese, milk and pudding mixes until smooth. Spread over the crust; refrigerate for 20 minutes. Spread with whipped topping. Chill until serving. Yield: 15 servings.


Monday, August 16, 2010

Rachael Ray's Sloppy Joe's

This is in no way a gourmet meal. I saw it on Rachael Ray at least 3 years ago and thought it looked good so I made it, switching it up a bit, and my family loves it. I usually have most, if not all, of the ingredients on hand too. The sauce is kind of sweet but savory and the pepper and onion are super yummy in here too. I'll give the recipe my way but if you want to see Rachael Ray's version click here (she uses ground turkey, amongst other differences).

I know you are super jealous of my 50 cent Fred Meyer buns. And I'll be the first to admit that these pictures are not the best!

Sloppy Joes

2 Tbsp extra virgin olive oil
1 to 1 1/2 lbs hamburger (I usually use 1 lb)
1/2 onion, chopped
1/2 green bell pepper, chopped
1 Tbsp grill seasoning blend (I use McCormick's Grill Seasoning for Chicken)
2 Tbsp brown sugar
1 Tbsp Worcestershire sauce
1 cup (8 oz can) tomato sauce
Hamburger buns or crusty rolls

Add oil to pan on medium high heat and add onion and pepper. Let soften for a couple of minutes and add hamburger and brown; drain. Meanwhile, mix the grill seasoning, brown sugar, Worcestershire sauce and tomato sauce together and mix into the hamburger. Let simmer on low for 10 minutes. Add to buns or rolls and enjoy!


Friday, July 30, 2010

Peanut Butter Chocolate Chip Cookies

I actually came across this recipe because my Aunt Jodi asked me to make cookies for Girls Camp, and I didn't want to make plain old chocolate chip. So when I went to make peanut butter cookies I realized that *gasp* I didn't have any white sugar in the house! Really? I have ten boxes of crackers, eight large bottles of ketchup, and enough shredded cheese to get me through any natural disaster, but I don't have sugar in my food storage? Trust me. It was an eye opener.

Anyway, I found this peanut butter chocolate chip cookie recipe that doesn't call for white sugar. Hooray! It's really good and really easy. And the odd thing? It asks for 1/4 cup of cornstarch in the mix. This is the first time I've ever used cornstarch for anything but thickening gravy. But they taste awesome!
Photo from Allrecipes

1 cup butter, softened
1 1/2 cups packed brown sugar
2 eggs
1 1/4 cup peanut butter
1 teaspoon vanilla extract
2 1/2 cups all-purpose flour
1/4 cup cornstarch
3/4 teaspoon salt
1 teaspoon baking soda
1/2 teaspoon baking powder
1 cup semisweet chocolate chips (I added a little more. Some other people used M&Ms, which I would have totally used if I had them.)

Directions

1.Preheat oven to 350 degrees F.

2.Cream together butter and brown sugar. Beat in eggs, peanut butter and vanilla.

3.Add flour, cornstarch, salt, baking soda and baking powder. Stir in chocolate chips.

4.Roll into balls about 1 1/2 teaspoonfuls (or use cookie scoop) and place onto ungreased cookie sheets about 2 inches apart. Flatten slightly because they do not flatten much while cooking.

5.Bake for 10 minutes.

Wednesday, July 28, 2010

Caramelized Onion, Sausage and Basil Pizza

I saw this on Giada at Home the other day and had to make it. Anything with caramelized onions on it has to be good! It wasn't super expensive either. Celeste's pizza dough recipe would be perfect for this too, just put the cornmeal on the bottom of your cookie sheet to make it kind of crunchy. Also, I used regular pork sausage, not spicy, so it was a little different I'm sure than what it was supposed to taste like, but it was still super yummy! If you aren't a gorgonzola fan, you can totally use blue cheese or something more mild like feta (oooh feta would be so yummy on this!). The gorgonzola was strong but it didn't overpower this pizza at all.


Picture Courtesy Food Network (my pizza had wayyyy more cheese!)


Caramelized Onion, Sausage and Basil Pizza
Giada DeLaurentiis


Cornmeal, for dusting
3 tablespoons extra-virgin olive oil, plus extra for drizzling
1 tablespoon unsalted butter, at room temperature
2 onions (about 1 1/2 pounds), thinly sliced (I used Walla Walla sweet onions)
1/4 teaspoon kosher salt
1/4 teaspoon freshly ground black pepper
1 pound spicy turkey or pork sausage, casings removed, crumbled (like I said, I used regular, but spicy would give it lots of flavor too)
All-purpose flour, for dusting
1 (13 to 16-ounce) ball pizza dough
3/4 cup (3 ounces) crumbled Gorgonzola or blue cheese (you can totally use more since mine came in a 5oz tub)
1/4 cup chopped fresh basil leaves (please don't skip this!)

Directions
Put an oven rack in the center of the oven. Preheat the oven to 475 degrees F. Sprinkle a heavy baking sheet (without sides) with cornmeal and set aside. (I actually baked mine at 425 accidentally and it turned out fine)

In a large skillet, melt 3 tablespoons of olive oil and the butter over medium-low heat. Add the onions, salt and pepper. Cook, stirring occasionally, until golden and caramelized, about 20 minutes. Increase the heat to medium-high and add the sausage. Using a wooden spoon, break up the sausage and cook, stirring constantly, until cooked through, about 8 minutes. Set aside to cool slightly.

On a lightly floured work surface, roll out the dough into a 13-inch diameter circle, about 1/4-inch thick. Transfer the dough to the prepared baking sheet and drizzle with olive oil. Spread the onion mixture evenly over the dough, leaving a 1-inch border. Sprinkle the cheese on top. Bake until the crust is golden and the cheese has melted, about 15 to 17 minutes. Remove from the oven and sprinkle with chopped basil. Cut the pizza into wedges and serve.

Wednesday, July 21, 2010

Almond Joy Cake

My WONDERFUL sister-in-law brought me this cake and it seriously almost brought tears to my eyes! It was soooo good! I obviously had to have the recipe but, I must warn you, do NOT make this cake unless you have somewhere to take it or someone to share it with! Or you WILL eat the whole thing yourself!!
I will post a picture later

Almond Joy Cake

  • 1 package chocolate cake mix with pudding
  • 1 cup evaporated milk
  • 1 cup sugar
  • 24 large marshmallows
  • 1 package coconut (14-oz)
  • 1/2 cup evaporated milk
  • 1/4 cup butter
  • 1 12 oz pack. Chocolate chips
  • 1 cupalmond slices -- toasted
Directions
  1. Bake chocolate cake as directed on package.
  2. Combine in medium saucepan 1 cup evaporated milk and 1 cup sugar, bring to a boil and stir in marshmallow until Melted.
  3. Add 1 package coconut, pour this over cake while both are hot.
  4. Melt together the remaining milk, butter and chocolate chips.
  5. Stir until melted and add 1 Cup toasted almond slices.
  6. Pour on top of warm cake.
*I think it tastes better cold. I would make it the day before and refrigerate until serving.
*My sister-in-law also said that next time she makes this she will poke holes in the cake before pouring on the coconut mixture so it soaks in.

Saturday, July 3, 2010

Nilla Wafer Caramel Pops

I got this idea from Kelli and I knew I had to make it as part of the goodie bags for Rix's Bday party. They were so easy to make and actually quite fun! We decided these would be fun for any holiday or event - Valentine treats for school classes or neighbors (add red and pink sprinkles, or heart sprinkles), Christmas treats, dip in chocolate and pipe orange frosting pumpkin faces for Halloween, etc. Or sprinkle with crushed nuts, oreos, etc. Drizzle with chocolate? The possibilities are endless! This is also something fun that your kids could help out with.
I wrapped them in sucker wrappers (I got them at Michaels) and tied a bow.

48 Nilla Wafers
1/2 bag of Kraft Caramels (I like the taste of Kraft better than other brands)
White or milk or dark chocolate (I used the Wilton Melting Chocolates)
Sprinkles
Sucker Sticks (found at Walmart, or craft stores)

Melt caramels with a little water according to package directions. Let cool slightly to it firms up a little. Using a small spoon, dab a small spoonful on one Nilla Wafer. Place sucker stick in caramel, twisting to cover the stick in caramel. Place second Nilla Wafer on top and gently squish together. Wipe any caramel off that squeezes through. Finish with remaining cookies and caramel.

Note: Don't dab all the caramel on the first 24 cookies and then place sticks and second cookie. The caramel will harden up too fast and the second cookie won't stick.

After caramel is cooled, melt chocolate in microwave according to package directions. Dip a sucker in the chocolate, covering completely, and tap off excess. Place on wax paper and sprinkle with whatever you are using to decorate. Let harden. Wrap in sucker wrappers and enjoy!

Wednesday, June 23, 2010

Baked Ziti


This recipe doesn't have the glamor of the previous recipes, but it's a goody. It's like a lasagna, but easier. I make it every time I need to bring dinner to someone. I buy the disposable pans and throw it in. If I were a little more prepared, I'd buy 3 square disposable pans and make one to bring, one for the freezer, and one for my family to make. Even then, I'd still have leftovers! I know Kristi made this recipe from the Biggest Loser's website. So, she may need to post her variation.

Also, you could use Kelli's spaghetti sauce for this recipe!

Baked Ziti
Sandy Liggett (Brent's cousin)

1 lb dry ziti, or tube noodles
onion
1 garlic clove
1 lb ground beef
2 26 oz spaghetti sauce
6 slices provolone cheese (I buy it from Sam's, divide it into freezer bags)
1 1/2 cups sour cream
6 oz shredded mozzarella cheese
2 Tbsp grated Parmesan

Cook noodles until al dente. Brown ground beef with chopped onion and garlic. Drain. Add spaghetti sauce. Layer in pan in the following order:

sauce (just enough to cover the bottom)
noodles
sauce
provolone (enough to cover)
sour cream
sauce
mozzarella cheese
Parmesan cheese

Bake at 350 for 30-minutes or until the cheese is melted and the sauce bubbling.

Sunday, June 20, 2010

Asian-Style Ribs

So I got this recipe from an April edition of Family Circle magazine, and was so excited to try it. I found pork ribs on sale for $1.99/lb and I had everything except the sesame oil and ginger. It was delicious! It's a slow cooker recipe, my favorite for busy days, and even Aubrey was eating it up. Jeremiah's only suggestion was to add a little more brown sugar. It would be great over rice!

Asian-Style Ribs

2/3 cup light brown sugar

1/2 cup low-sodium soy sauce

2 Tablespoons sesame oil

2 Tablespoons rice vinegar

2 Tablespoons minced fresh ginger

4 garlic cloves, crushed

1/2 teaspoon red pepper flakes

1 rack pork ribs (about 3 pounds), cut into sections of 3 to 4 ribs

2 Tablespoons cornstarch

3 scallions, trimmed and thinly sliced

1 teaspoon sesame seeds

Directions:

  1. In a small bowl, blend sugar, soy sauce, sesame oil, vinegar, ginger, garlic, and red pepper.
  2. Place ribs in a slow cooker bowl; add sauce. Cover; cook on HIGH for 6 hours or until meat is tender.
  3. Transfer ribs to a platter. Strain sauce and discard extra fat. Combine cornstarch and 1/4 cup water; blend with sauce in saucepan. Bring to a boil over high heat and cook for 2 minutes, stirring, until thickened. Top ribs with 1/2 cup of the sauce, scallions, and sesame seeds. Serve with remaining sauce.


Friday, June 11, 2010

Peanut Butter Cheesecake Brownies

These were really good and rich, so it was easy giving half of the pan away to family and friends since I couldn't eat very many. But they are so good. Don't be daunted by the steps. Most of it is just cooling time in the fridge. These taste better the day after too after they are set up more.

Oh, and in this recipe, you really have to use the Pillsbury brand brownie mix! The first time I made them I used Duncan Hines mix and the brownie layer was totally uncooked and gooey. Like bad gooey. So I read on the Pillsbury website under the reviews for the recipe, and someone said that she had the same problem with using Betty Crocker, and so it only works with the Pillsbury (trust me on this).


1 box (19.5 oz) Pillsbury® Chocolate Fudge Brownie Mix (you really have to use the Pillsbury brand!)

1/2 cup vegetable oil
1/4 cup water
2 eggs
1 package (8 oz) cream cheese, softened
1 can (14 oz) Sweetened Condensed Milk
1/2 cup Creamy Peanut Butter (I used crunchy and it was fine, although I think creamy is better)
1 bag (8 oz) Heath® milk chocolate toffee bits
1 cup milk chocolate baking chips
3 tablespoons whipping cream (I just used milk and it was fine.)
1. Heat oven to 350°F. Lightly spray 13x9-inch pan with cooking spray.

2. In medium bowl, stir brownie mix, oil, water and eggs 50 strokes with spoon. Spread batter in pan; set aside.

3. In large bowl, beat cream cheese with electric mixer on medium speed until fluffy. Add milk and peanut butter; beat until smooth. Stir in 1 cup of the toffee bits. Spoon mixture over batter; spread evenly. (Spooning the mix over the batter is a little tricky. Just be patient and know it doesn't have to be perfect).

4. Bake 30 to 40 minutes or until cheesecake layer is set and edges are light golden brown. Cool on cooling rack 30 minutes. Refrigerate 40 minutes.

5. In small microwavable bowl, microwave chocolate chips and cream (or milk) uncovered on High 40 to 60 seconds or until chips are melted; stir until smooth. Spread over cheesecake layer. Sprinkle with remaining toffee bits. Cool completely, about 1 hour. Serve cold. Store covered in refrigerator.

For higher altitudes, you can click on this link for tips on how to adjust the recipe.

Tuesday, June 1, 2010

Tasty Meatloaf

Another Sisters' Cafe recipe. I really like their recipes. I made this for Sunday dinner with my parents over and everyone loved it. My kids even ate it up without complaining (except for Jack but that's because he wanted to go upstairs and play Mario Kart). One suggestion, since this makes two meatloaves, is to freeze the second meatloaf for another day. The girls at Sisters' Cafe suggest baking the second one in a disposable foil bread pan so you don't have to use one of your metal pans for the freezer.

(Picture courtesty Sisters' Cafe)
Tasty Meatloaf

1.5 lbs. lean ground beef

1.5 lbs. ground turkey
1 large onion, chopped finely
1 box stuffing mix (any kind)
1 (8 oz.) can tomato sauce
2 Tb Worcestershire sauce
1/4 tsp pepper
1 cup fat free or light sour cream
1/2 cup milk
1 packet of dry ranch dressing mix
2 cloves garlic, minced
1 tsp oregano
1 egg

Sauce (the BEST part!)
Stir together in a bowl:
2/3 cup ketchup
1/2 cup brown sugar
1 1/2 tsp prepared mustard

Combine all ingredients in a mixer (Kitchen Aid with paddle attachment works great, just make sure you put the lid on it so things don't go flying). Divide into two 9 inch loaf pans. Do not cover. Bake in a preheated oven at 350 degrees for one hour. Remove loaves and drain any accumulated grease in pans. Top with sauce and bake an additional 30 minutes. Once it has mostly cooled you can wrap tin foil over the top of one and put it in the freezer for later.

Sunday, May 23, 2010

Texas Caviar II

I know there is another Texas Caviar post on the blog, but this one is a lot different and we here in Poyfair land LOVE it. You make it, let it sit a couple hours, and the enjoy! It is super yummy and makes a ton so it's perfect to bring to potlucks and summer gatherings along with some tortilla chips. Or you can just keep it all to yourself like we like to do sometimes. And for those of you who do not like cilantro, go ahead and add it. I don't care for it myself, but in this dish you can't really taste but it really makes the dish amazing.

Texas Caviar II
1 can white shoepeg corn

1 can black eye peas
1 can black beans
1 can kidney beans
**rinse first then throw in bowl

3 avocados - diced
3 tomatoes - diced
1 red onion - diced (amount can be up to you. I only use 1/2 to 3/4)
1 green pepper - diced
1 bunch of cilantro – rinse and chop

Mix everything then squeeze 1 lime and 1 tsp. of vinegar and let sit for a couple of hours. Serve with tortilla chips. We like the small bite sized ones the best but that's just our preference.

**I also add salt to mine. I just toss some in and stir then taste it and add more if I need. I think it needs it but it's up to you.

Saturday, May 22, 2010

Salted Caramel Cupcakes

Unlike Celeste, I am not experienced with baking gorgeous cupcakes. So, in preparation for the wedding I've been experimenting. I found this recipe, but failed at making it the first two times. I was determined and found some tips for baking in high elevation (even though I don't think I've ever really been impacted by it before). The final result was perfection. This recipe is fairly easy to make and feels so gourmet. Hopefully Celeste will frost all my cupcakes if I make the frosting and bag it for her before...please please please!

By the way, when making homemade cupcakes, do not overfill the liners. Just fill a little over halfway. Or just halfway. They overflow very easily!

Salted Caramel Cupcakes
recipe by ourbestbites.com

HE will stand for High Elevation. You Washington/Oregon people don't need to worry your little heads about this!

CUPCAKES:
1 1/4 c. all-purpose flour
3/4 tsp. baking powder (HE 1/2 tsp)
1/4 tsp. salt
1 c. firmly packed dark brown sugar (HE minus 1 TBSP)
(dark brown sugar is REALLY important!)
1/2 c. sugar (HE minus 1/2 TBSP)
1/2 c. butter, softened
2 large eggs at room temperature
1 tsp. vanilla
1/2 c. milk (plus 1 TBSP)

Preheat oven to 350 (HE 375 degrees). Using 18 cupcake liners, line muffin tins. I used paper liners, but I think foil would be a better choice.

In a bowl, whisk together the flour, baking powder, and salt.

In another bowl (preferably the bowl of an electric mixer), combine sugars and butter together on medium-high speed for 2-3 minutes. Add eggs and vanilla and beat until combined. Add flour mixture in 3 additions, alternating with the milk in 1 additions, beating on low speed until just combined; scrape down the sides of the bowl as needed.
Divide the batter evenly among the prepared muffin cups, filling about 2/3 full. Bake 20-22 minutes or until a toothpick inserted into a cupcake comes out clean. Allow cupcakes to cool in the pan on a wire rack for 5 minutes and then transfer the cupcakes to the wire rack and allow to cool completely.

TO GO ON TOP:
Sara's Perfect Cupcake Frosting
About 1/2 c. caramel sauce or buttermilk syrup
12 Werther's soft caramels
Dipping chocolate (just a wee bit), made with bittersweet or dark chocolate; I used 4 oz. of chocolate with 1 tsp. canola oil and had plenty leftover
Kosher or sea salt

Prepare dipping chocolate. Dip the ugly side of the caramel into the chocolate, about halfway down the caramel. Place chocolate-side-up on a plate and then allow to harden.


Prepare Sara's Perfect Cupcake Frosting. This is a really fun way to make frosting. It does turn out fluffy. I've loved making it!

Perfect Cupcake Frosting and Filling

3 T Flour
1/2 C milk (whole milk is best, but I used non-fat when it's all I have and it's actually fine)
1/2 C real butter
1/2 C sugar (that's granulated sugar, not powdered sugar)
1 t vanilla extract, or other flavor if you wish.

Whisk together the flour and the milk. Heat in a small sauce pan on medium heat. Whisk continuously until it starts to thicken. I think this is the critical point for any of you who have had problems with this recipe. I have a feeling people are under-cooking this part. Let it cook, while stirring, until it looks like pudding (you should be able to see the bottom of the pan when you stir it). Even though it's thick, you can still it through a mesh strainer (just whisk the mixture in the strainer to push the thick stuff through) and then let it cool completely to room temp. or chill it in the fridge. It needs to be cooled completely. If you don't let it cool completely, it will melt the butter and you'll have runny frosting.

It an electric stand mixer, beat the butter and the sugar for a minute or two until well combined and fluffy. You'll want to use the whisk attachment on a stand mixer, not the flat paddle. Then while beating, add in the thickened milk mixture and the vanilla. Beat on the highest speed you can get to without it spraying all over the place for 7 minutes. Yes, 7 whole minutes, maybe even 8 or 9. I know that seems like a long time, but that's when the magic happens!

You will be scared because it will look like a weird goopy mess at first and you'll wonder what on earth you did wrong. Keep beating and something amazing happens. It goes from that goopy mess to something thick, velvety smooth, and perfectly fluffy. Use it to fill cupcakes or other pastries, or as a frosting on top. You can't go wrong putting this on just about anything :)

One batch makes enough to frost 12 cupcakes with BIG tops. If you're just spreading a little on top, it will do 24.

After trouble-shooting with a lot of people, here are some helpful Notes:

1. Use real butter, and a good name-brand. Cheap butter does weird things.

2. If you beat for the 6-8 minutes and the mixture still looks strange, beat longer and at a higher speed if you can. It should come together, but it takes a little patience!

3. Store at room temperature in a sealed container. Frosting may separate in the fridge, but you can store it overnight if left at room temp and in a well sealed container.


Very gently mix the caramel sauce or buttermilk syrup into the frosting--you want there to be swirls of caramel visible. Add a little more if you want--this is an art, not science here!

After you've frosted the cupcakes (dollops work fine on these), top each cupcake with a chocolate-dipped caramel and then sprinkle with a VERY scant sprinkling of Kosher or sea salt--it's just a little garnish and a really enhances the flavors of the cupcake.

Monday, May 17, 2010

Chive Biscuits


I made these for Mother's Day. They were so easy and delicious. The family fought over them, and even my non-bread-eater (Hayden) had two. You can substitute parsley for chives.
Chive Biscuits
by Ina Garten
2 cups all-purpose flour
1 Tablespoon baking powder
1 teaspoon kosher salt
1 teaspoon sugar
1/4 pound (1 stick) cold unsalted butter, diced
3/4 cup half-and-half
1/2 cup chopped chives or fresh parsley leaves
1 egg mixed with 1 Tablespoon water, for egg wash
Preheat oven to 400 degrees.
Combine the flour, baking powder, salt, and sugar in the bowl of an electric mixer fitted with the paddle attachment. Add the butter and mix on low speed until the butter is the size of peas. With the mixer on low, add the half-and-half and beat until just mixed. Add the chives and mix until just combined.
Dump the dough out on a well-floured board and knead lightly into a rectangle 3/4-inch thick. Cut out rounds with a 2 1/2-inch round cutter (I'm ghetto, I used a baby bottle!) and place on a sheet pan lined with parchment paper. Brush with the egg wash.
Bake for 20 to 22 minutes, until the tops are browned and the insides are firm. Serve warm.

Friday, May 14, 2010

Lemon Cupcakes


Okay, I know we already have a lemon cupcake recipe on our blog that is amazing. But, this one is different and from scratch. I've been experimenting with different recipes for Brent's brother's wedding. If I wasn't already doing the lime coconut ones, I would definitely do this one. They are so light and so fluffy and so yummy. I could eat them all day (and have been).


Lemon Cupcakes

1 1/2 c. (3 sticks) of REAL butter
3 c. cake flour (no substitutions here--you really need the lightness of cake flour)
1 tsp. baking powder
1/2 tsp. salt
1/2 tsp. baking soda
2 c. sugar
5 large eggs
2 tsp. vanilla extract
4 Tbsp. freshly squeezed lemon juice
Zest of 2 lemons (just zest the other lemons before you squeeze them)
1 c. buttermilk
Preheat oven to 325. Line 2 12-cup muffin tins with cupcake liners (I used yellow, although white would also be cute).

In the bowl of an electric mixer fitted with the paddle attachment, beat butter and sugar on medium speed until light and fluffy, 4-5 minutes. Don't go skimping here--you want the mixture to be almost white and super fluffy. This is absolutely essential to the outcome of the cake.
While butter and sugar are mixing, sift together flour, baking powder, salt, and baking soda in a medium bowl. Set aside. After butter and sugar have mixed sufficiently, With the mixer running, add eggs, one at a time, beating to incorporate after each addition. Beat in vanilla, lemon juice, and lemon zest.

With mixer on low speed, alternate adding flour mixture and buttermilk, beginning and ending with the flour mixture and beating until fully incorporated.

Using a standard cookie scoop, place about 2 scoops of batter into each muffin cup. Fill these almost to the top--due to the final texture (again, think super-moist and light pound cake), these cupcakes won't have a nice, curvy crown, but that's okay--no one will ever know or care.

Bake about 20-25 minutes or just until a toothpick inserted into the center of one of the cupcakes comes out clean. You don't want to overbake these even a bit, or they'll start to lose their delicious moisture. Remove from oven and cool completely. Frost with lemon buttercream and garnish with strawberries, blueberries, raspberries, or fresh mint leaves.

Lemon Buttercream

1 1/4 c. butter (2 1/2 sticks)
2 tsp. grated lemon rind
3 Tbsp. fresh lemon juice
3 c. powdered sugar

Beat butter, lemon rind, and lemon juice in an electric mixer until creamy. Gradually add powdered sugar, beating to spreading consistency. Makes 2 3/4 c.

Sign in Recent Site Activity Terms Report Abuse Print page | Powered by Google Sites

Tuesday, May 4, 2010

Lime Coconut Cupcakes with White Chocolate Frosting

For Brent & Bryan's brother John's wedding reception, the girls are in charge of cupcakes. It's been so fun trying new recipes and searching for the one to make. I found this one on Nie Nie's recipe blog (linked on our blog below). I made these today and they are worth the time and effort. I may not make them frequently, but when I'm wanting to impress--I'm sticking with these. I think I've eaten 6 already.

Lime Coconut Cupcakes with White Chocolate Frosting
{from CuisineNie who adapted it from Food Network}
Makes a whole lot (2 dozen).

3/4 cup (1 1/2 sticks) unsalted butter, at room temperature
1 cup granulated sugar
2 eggs, at room temperature
1 tsp pure vanilla extract
1 1/2 tsp grated key lime zest
1 1/2 Tbsp freshly squeezed lime juice
1 1/2 cups all-purpose flour
1/2 tsp baking powder
1/4 tsp baking soda
1/4 tsp kosher salt
1/2 cup buttermilk
1 cup loosely packed sweetened coconut flakes (3.5 ounces)

* Preheat oven to 325 degrees F.
In the bowl of an electric mixer fitted with the paddle attachment, cream the butter and sugar on high speed until light and fluffy, about 5 minutes.

With the mixer on low speed, add the eggs, 1 at a time, scraping down the bowl after each addition.

Add the vanilla extract, key lime zest and juice and mix well.

In a separate bowl, sift together the flour, baking powder, baking soda, and salt. In 5 parts total, alternately add the dry ingredients and the buttermilk to the batter, beginning and ending with the dry. Mix until just combined.

Fold the coconut into the cupcake batter.

Line a muffin pan with paper liners and fill each liner almost to the top with batter. A spring loaded 1/4 cup ice cream scoop works great for this and ensures the cupcakes are all the same size.

Bake for 25 minutes or until the tops begin to brown and a toothpick comes out clean.

Remove cupcakes from oven and allow to cool in the pan for 10 minutes and then transfer cupcakes to a baking rack to cool completely.


The Frosting:
5 ounces good quality white chocolate, chopped into small chucks 1/2 cup
(1 stick) unsalted butter, room temperature
3 1/2 cups powdered sugar, sifted
Pinch salt
1/2 tsp pure vanilla extract
1 Tbsp lime juice (bottled or freshly squeezed)
1/4 cup sour cream Fresh lime slices, for garnish

While the cupcakes are cooling you can make the frosting. In a small heat proof bowl set over a pot of simmering water, carefully and slowly melt the white chocolate. Remove from heat and let cool until just slightly warm.

Meanwhile, in the bowl of an electric mixer fitted with the paddle attachment, beat the butter until light and fluffy. With the mixer on low, gradually add the powdered sugar until well combined.

Add the salt, vanilla extract, key lime juice, and sour cream and mix until very smooth. Add the melted white chocolate and mix just until incorporated. Frost the cupcakes and garnish with a bit of grated key lime zest.

* If you don't want to place fresh lime slices atop, you can always candy your lime slices so they are more edible. Google "candy limes" to find the how-to.

Thursday, April 29, 2010

Marinara Sauce

I don't have a picture of this, it's marinara...just picture it in your head. It is so much better than jarred pasta sauce! The funny thing is it doesn't call for any spices except garlic and bay leaf, but for some reason it is awesome. And, because you can make a big batch and freeze it, it is less expensive than jarred pasta. This recipe makes two servings. I used one for manicotti and one for spaghetti. I just added 1 lb browned hamburger to the marinara for the spaghetti and Jeremiah and I fought over the leftovers.

Marinara Sauce
from Giada de Laurentiis

1/2 cup extra-virgin olive oil
2 small onions, finely chopped
2 garlic cloves, finely chopped (some people add more)
2 carrots, peeled and finely chopped
2 stalks celery, finely chopped.
1/2 teaspoon salt
1/2 teaspoon freshly ground black pepper
2 (32-oz) cans crushed tomatoes (I can only find 28-oz cans, which work fine)
2 dried bay leaves

In a large casserole pot, heat the olive oil over a medium-high flame. Add the onions and garlic and saute until the onions are translucent, about 10 minutes. Add the celery, carrots, salt, and pepper. Saute until all the vegetables are soft, about 10 minutes. Add the tomatoes and bay leaves and simmer, uncovered, until the sauce thickens, about one hour. Remove from heat and discard the bay leaves. Season the sauce with more salt and pepper, to taste.

Tuesday, April 27, 2010

Cheesecake Cookies

Brent has a broker who emails recipes. When I saw this one, I knew I had to try it. You should know that I have an infatuation with Lorna Doone shortcake cookies. And, I didn't realize the cookie part of these are shortbread (made with cream cheese). I was in heaven. They're filling and sweet. So, it doesn't leave you wanting to eat a dozen (like chocolate chip cookies do). They're a grown-up's cookie.

Cheesecake Cookies

Cream Cheese Filling:
4 oz cream cheese
2 TBSP sugar
½ tsp grated lemon rind
1 egg yolk
1 TBSP half and half or sour cream

Beat together until smooth. Refrigerate.

Cookies:
1 cup butter
4 oz cream cheese
1 cup sugar
1 egg
1 tsp grated lemon rind
1 TBSP lemon juice
2 ¼ cup flour
1 tsp baking powder
¼ cup fine graham cracker crumbs

Cream butter, cream cheese and sugar until blended. Add egg, lemon rind and lemon juice. Mix well. Combine flour and baking powder. Add to first mixture and blend well. Cover and chill for at least 1 hour Shape dough into 1-inch balls. Roll in graham cracker crumbs. Arrange on ungreased baking sheets. With finger make an indentation in center of each cookie. Fill with ½ tsp of filling. Bake at 350 degrees for about 20 minutes. Remove to cool on wire racks. Store in airtight container.

Sunday, April 25, 2010

Orange-Honey Syrup

We love to have breakfast for dinner A LOT in my house. You can probably guess that I am not a morning person by that fact! Here is a delicious twist I just came across for regular or maple syrup. Sooo good that I am not sure I will buy Mrs. Butterworth's anymore! Sorry I forgot to take a picture....next time.


Orange-Honey Syrup

1/3 cup honey

1/3 butter

1/3 orange juice

1/2t. grated orange peel

combine all ingredients into a sauce pan and simmer until it thickens. Enjoy!

Wednesday, April 14, 2010

"Homemade" Doughnuts

I saw this on a friend's blog and had to try it. It was super easy and undescribably yummy! We made it for FHE and my kids have been begging me ever since to make them. Just a note, I would not recommend the biscuits that peel in layers. Just regular old biscuits!
1 tube biscuits (I used regular buttermilk)
Oil for frying (I didn't say they were fat free, just yummy!)
Powdered sugar, milk and a little vanilla for glaze (or you could use frosting)

Dump oil into a deep pan (I used an entire bottle of vegetable oil but it depends on how big your pan is). Heat oil to 375. Using a medicine cup (or something similar) cut out a hole in the middle of the biscuits. Fry the biscuits on each side until golden brown. Drain on a paper towel lined plate and then place on a cooling rack. Dip each doughnut face down in the glaze and let it melt down the sides (you can do it all over but I didn't make enough glaze for that). Enjoy!

Also, make sure the doughnuts are golden because then they are done on the inside. I tried to fry the middles into doughnut holes but the insides weren't done so if you try making doughnut holes just let them brown up a little more than usual.

This took me abour 10 minutes from start to finish. And next time we are using more than one tube of biscuits!

Saturday, April 10, 2010

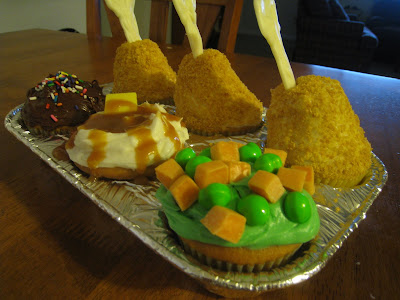
April Fools Day Cupcakes (and a dinner idea)

I can't take credit for these cute and fun cupcakes. First, they are in a book called Hello Cupcake that has lots of cute ideas for April Fool's Day, Easter, Halloween, Christmas, birthday, etc. Second, my friend Summer made these last year for her family and I thought they were super cute. I happened to already have the book so I took the time to make them for my family this year.

First, all I did was buy some foil cupcake pans at the store. There are three in a package and they come with the liners too.
Second, I baked up some cupcakes. I decided on vanilla. I also had some leftover cupcakes and made some mini cupcakes, which was a good idea (if I do say so myself) because I ended up using them later on. Just make sure you don't overfill these cupcakes. Two-thirds and no more!

Peas and Carrots
Tint frosting green. I used green Runts and diced orange Starburst.

Mashed Potatoes
Pile on the white frosting, making a well in the center and building up the wall a little. Put a yellow Starburst a little off center and pour on some warm caramel sauce for the "gravy", letting it spill over a little.

Chicken Legs
Frost the cupcake, then secure a mini cupcake (or small doughnut hole) off center with toothpicks. Build it up with frosting until it looks like a cone and then roll around in cornflake crumbs. For the bone, I piped some melted white chocolate into a bone shape and let it set in the freezer, then stuck it on the top.

For dinner, we had mashed potato "sundaes" where we layered mashed potatoes, popcorn chicken and corn into sundae glasses, topped with gravy and a cherry tomato. Super cute and my kids loved eating out of fancy glasses (I got them at the dollar store).
It's a terrible picture and I used instant mashed potatoes which weren't as stiff as homemade, but you get the point, right? I stuck in some Garlic Ranch Breadsticks from the Barefoot and Baking blog too. They were twisted so they kind of looked like a cookie and they were soooo yummy! You can't go wrong with garlic and ranch dressing!

Saturday, March 27, 2010

Chocolate Peanut Butter Candy

This recipe seemed kind of weird at first but I decided to give it a try and HOLY COW! They were so so so good and I think Christina and Brent will vouch for these! Everything about them is delicious but my favorite part is the caramel filling. It just oozes all over. I seriously could have eaten the whole pan if I didn't know how many calories were in these! I hate it when they put the nutritional facts on the recipe!! btw, this recipe came from my Taste of Home magazine.


Ingredients
1-1/2 cups graham cracker crumbs
1 cup sugar
3/4 cup packed brown sugar
3/4 cup butter, cubed
1/3 cup 2% milk
2 sleeves butter-flavored crackers (about 80 crackers)
1 cup butterscotch chips
1 cup (6 ounces) semisweet chocolate chips
3/4 cup creamy peanut butter

Directions
In a saucepan, combine the cracker crumbs, sugars, butter and milk. Bring to a boil, stirring constantly; cook and stir 5 minutes longer.
Place a single layer of crackers in a greased 13-in. x 9-in. dish; top with half of crumb mixture. Repeat layers. Top with remaining crackers.
In a small saucepan, combine the butterscotch chips, chocolate chips and peanut butter. Cook and stir until smooth. Pour over crackers. Let stand until set. Yield: 15 servings.
Editor's Note: This recipe was tested with Keebler Town House crackers.

Sunday, March 21, 2010

Chocolate Mousse Cake


A few years ago, Celeste's friend and amazing cook brought this cake by. It was incredible, and she gave us the recipe. Celeste asked me to send her the recipe, and I just realized I never did. I went ahead and made it today for my mom's birthday, and it's as amazing as I remember it. Don't be afraid of it--if I can make it so can you! It's easier than cake decorating and yummier too!


Chocolate Mousse Cake

Crust:
3 egg whites
1/4 tsp Cream of Tartar
1 cup Sugar
1 cup chopped walnuts
30 Saltine Crackers, crushed (I put mine in my veggie chopper, worked great!)

beat egg whites with cream of tartar until soft peaks form. Add sugar gradually and beat until stiff. Fold in cracker crumbs and walnuts. Spread in bottom of greased and floured (or Pam-ed) 9-inch spring form pan. Bake at 350 for 12 minutes.


Filling (brownie layer):
1/2 cup butter, melted
1 cup sugar
2 eggs
2 oz unsweetened chocolate, melted
1/4 cup flour
2 tsp vanilla

Melt chocolate and butter on low heat (I microwaved it). Cool slightly then add sugar and eggs. Beat on low until smooth and fold in flour and vanilla. Pour on top of baked crust and return to oven at 350 for about 22 more minutes.


Mousse:
2 cups semi-sweet chocolate chips
2 pkgs (8 oz) cream cheese, softened
1 1/3 cups powdered sugar
2 cups whipping cream
2 tsp vanilla

Melt chocolate. Cool slightly and add cream cheese, powdered sugar and vanilla. Beat whipping cream until firm then add to cheese mixture. Pour on top of completely cooled filling (I put my filling in the freezer for about an hour cause I was in a hurry). Let set up in the refrigerator all day or overnight.


Frosting:
2 cups whipping cream
powdered sugar
1 tsp cocoa powder

Whip it until it is a good spreading consistency. Take cake from spring form pan and frost sides and top of cake. Very rich, cut small pieces.

Friday, March 19, 2010

Bacon Cheeseburger Pizza

I was a little nervous to try this recipe because, well, it's different. But it got great reviews and I thought, what the heck? What's the worst that can happen besides maybe throwing it away and ordering takeout?? And since Friday nights are pizza night in our house, I am always looking for a new idea for pizza. I hope you all get a chance to try this out! I tweaked it a little bit, I added bacon and omitted the onions. My whole family ate this up and Bryan said it was a keeper (which doesn't happen often!).

1 pound hamburger (I seasoned mine with McCormick's Roasted Red Pepper and Garlic, but season as you wish!)
1 (12-inch) prepared pizza crust (I used the recipe below)
1/2 cup yellow mustard
2 cups shredded mozzarella cheese
1/2 cup chopped onions (I omitted this, but maybe green onions would be good!)
15 dill pickle slices
3/4 cup shredded Cheddar cheese
1/2 package bacon, chopped into pieces, cooked and drained

Brown the hamburger, seasoning to your liking. Set aside. Cook bacon, set aside. Prepare cruse (I used the recipe below, and it is awesome because you make it and you can use it right away, with NO rising time!)

3 cups all-purpose flour

1 (.25 ounce) package active dry yeast
2 tablespoons vegetable oil
1 teaspoon salt
1 tablespoon white sugar
1 cup warm water (110 degrees F/45 degrees C)

1.Combine flour, salt, sugar, and yeast in a large bowl. Mix in oil and warm water. Spread out on a large pizza pan. 

2.Bake at 375 degrees for 15 minutes.

Top cooked dough with mustard. Then add 2 cups mozzerella, hamburger, bacon, pickle slices, and cheddar cheese. Cook 10-12 minutes longer, until cheese is melted.

**I think it would be easier to chop up the pickles slices - it would be easier to eat. But the slices look so cool on the pizza!

Wednesday, March 17, 2010

Swedish Pancakes

I can't believe we (as in my sisters and I) haven't posted this yet! We grew up on Swedish Pancakes, which are pretty similar to crepes. We usually put maple syrup in the middle and rolled it up, although we've also filled it with fruit and whipped cream. My inlaws make crepes with orange zest in it, that might be fun too. Oh, and a new fave of ours is Nutella or peanut butter with bananas. Every time I make them reminds me of Saturday mornings at my parent's house.

Swedish Pancakes (feeds a family of 4-ish, so you can double or triple this)

1 cup milk
4 eggs
1 teaspoon vanilla
1/4 cup sugar
1/2 teaspoon salt
1 cup flour, not sifted

Mix all ingredients except flour together in a bowl with an egg beater or a mixer with the whisk paddle attached. Add flour and mix until smooth. In a large pan or crepe pan, with about 1/2 Tablespoon melted butter coating it, pour about 1/4 to 1/3 cup batter into the pan, swirling the pan to cover the entire bottom (first photo). Once the edges are started to turn brown, flip the pancake over. Let cook until golden spots appear on the pancake (second picture). Stack pancakes together between wax paper or serve them up to hungry family members who are waiting for more. To fill, put filling choice in the down the middle of the pancake and roll it up like a cigar (picture 3).


Want to make your own maple syrup???
Maple Syrup
1 cup water
2 cups sugar
1/2 teaspoon Mapeline (maple extract)
Boil water in a small saucepan. Add sugar and stir until dissolved. Remove from heat and add the Mapeline. It will be thin, but it's so good. Use a small ladle or gravy boat to serve. My dad saves old store-bought syrup bottles and fills them with his syrup.

Tuesday, March 16, 2010

Cafe Rio Salad Dressings

I know we already have two recipes for Cafe Rio salads on our blog, but this is a different dressing that is AMAZING! I had it at a baby shower, and honestly, the dressing made the meal. You have to try this next time you make the salad! It's easy and just wonderful. I love the garlic flavor in it. Happy Cafe Rio-ing!

1 1/3 cup sour cream
3/4 cup mayo
1 bunch of cilantro
1 pkg Ranch dressing mix
4 Tbsp salsa verde (green salsa)
2 cloves garlic
1/8 tsp Tabasco sauce (I omitted this)
juice of one lime

Mix together in a blender--and that's it!

Sunday, March 7, 2010

Easy Cake Cookies

I know we all have our favorite chocolate chip cookie recipe but this recipe caught my eye because of how versatile and easy it was! You make this cookie with a box of cake mix! Since I stock up on my boxed yellow cake mix when it is on sale (for lemon blossoms!) I used that and normal choc. chips. You can change this up and make any kind of cookie you could imagine. They are fluffy and have a great taste to them. Give them a try the next time you are in a pinch for time, you won't be disappointed.

Easy Cake Cookies


1 Box cake Mix (any flavor)
1/4 C. Flour
1/4 C. Water
1/2 C. Oil
1 Egg
1 C. Chocolate Chips (any flavor)

Mix together all ingredients adding choc. chips last. Drop spoonfuls on a greased cookie sheet. Bake at 350 for 10-12 min. The cookies will be lightly browning on the ends. You can mix up this recipe and make chocolate cookies with butterscotch choc. chps or maybe mint! So many possibilities I cannot wait to make some more flavors!!!

Thursday, March 4, 2010

Crockpot Chicken Tortilla Soup

This recipe is from the Sisters' Cafe blog, which I have been frequenting lately. I'm making some other dishes from their blog later this week (including Honey Lime Enchiladas!) and anything new I like I'll definitely share! Make sure when you make this soup, that you put the tortilla chips at the bottom, top with the soup, and finish off with shredded cheese and sour cream. My soup wasn't nearly as soupy as the one in the picture. It was really thick but tasted fantastic. Next time I'll add in some chicken stock at the end if it's too thick.

My kids loved this soup and my husband said it was a keeper. It was super simple- just throw it all in the crockpot and let it simmer for 8 hours on low, and there you go! It made my house smell yummy too! I know all of you in Utah need some warmth and soup is so easy. Plus, this one is super figure friendly if you use light or fat free sour cream and little cheese.
Picture courtesy The Sisters' Cafe

4 chicken breast halves (I've used 3 big ones and had it turn out great)
2 15-oz cans black beans, drained
2 15-oz cans Mexican stewed tomatoes
1 cup salsa (they used medium, but mild would be fine, just not as flavorful)
1 4-oz can chopped green chilies
1 14 ½-oz can tomato sauce
Tortilla chips, not optional :)
2 cups grated cheddar cheese (I prefer sharp)

Combine all ingredients except chips and cheese in large slow cooker. Cover and cook on low 8 hours. Just before serving, remove chicken breasts and slice or shred into bite-sized pieces. Stir into soup. To serve, put a handful of chips in each individual soup bowl. Ladle soup over chips. Top with cheese.